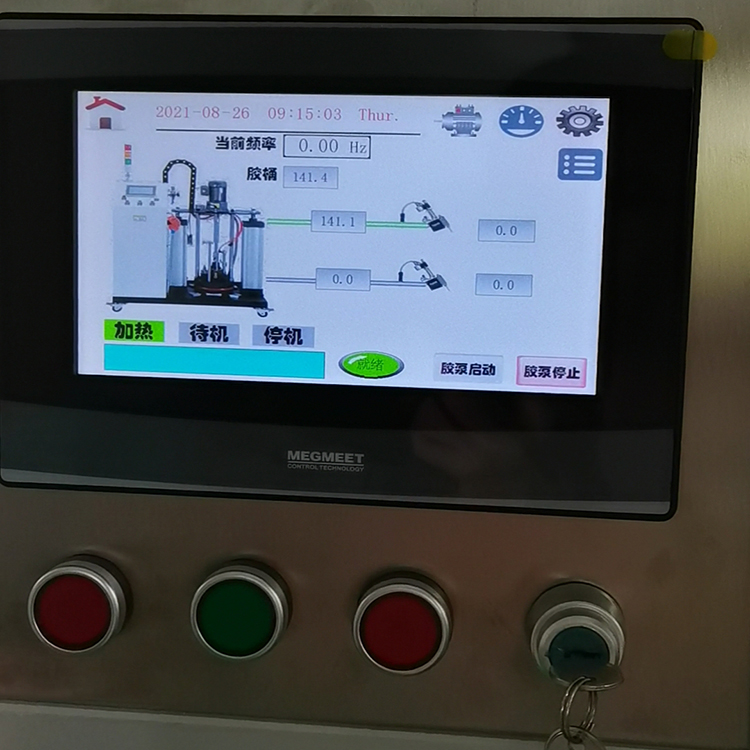
Our hot melt glue machine has three
switches: the main power switch, the leakage switch in the electrical box, and
the key switch on the control panel. Turn on the three switches in sequence,
and the touch screen displays the boot up. Wait about 2 seconds to enter the
initialization interface. At this time, there are two different languages to
choose from, Chinese and English, and the control interface is displayed in
different languages to meet the operating needs of foreign friends. Here we
choose Chinese to enter the system, after entering the main interface, click
the gear button in the upper right corner to enter the temperature setting.
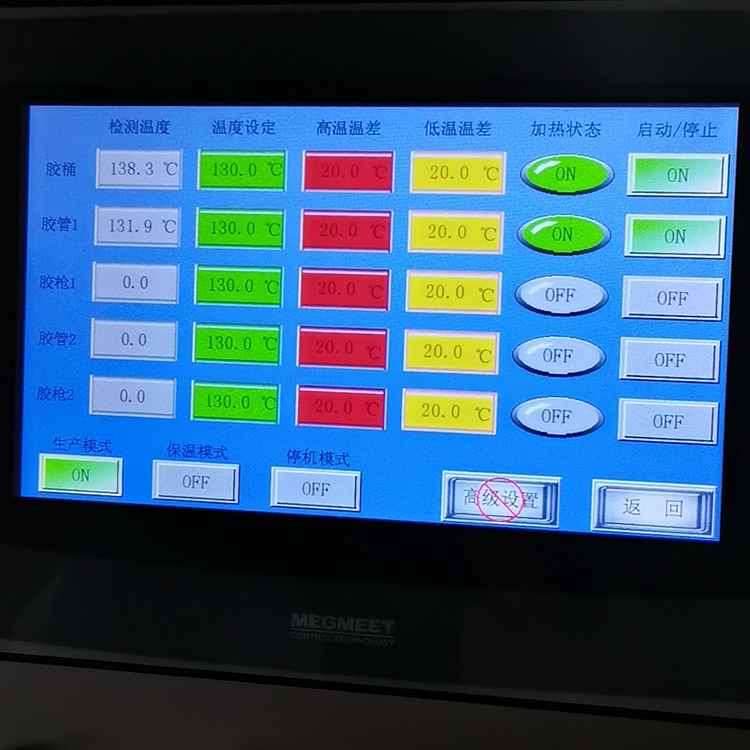
Our hot melt glue machine has 2 channels of
glue delivery and 5 channels, which are glue barrel, hose 1, glue gun 1, hose
2, glue gun 2. That is to say, you can connect up to two sets of hoses and glue
guns. Customers can Connect one or two sets of hose glue guns according to your
needs. We first click on the "temperature setting" of the uppermost
glue bucket, and the setting interface will automatically pop up. The working
temperature of PUR hot melt adhesive is lower than that of EVA hot melt
adhesive, usually at 120-140°C. Here we set it to 130°C, click OK. There is
"detection temperature" in front, it is the current actual temperature
of the rubber barrel detected by the system temperature sensor, we don't care
about it.
Then there are high temperature difference
and low temperature difference behind, this is only 20℃ by default,
which means that when the detected temperature is higher than the set
temperature and exceeds the high temperature difference, it will automatically
alarm, and it will not work if it is lower than the low temperature difference.
There is "Start/Stop" at the end. If we need to heat this part, set
the state to ON, otherwise, set it to OFF. Now we see that there is another
"heating state" that is OFF. This requires us to light up the
"production mode" in the lower left corner and it will automatically
change to the ON state before the heating mode is officially started. Next, we
will set the temperature of hose 1 and glue gun 1 in the same way. Here, hose 2
and glue gun 2 are temporarily unused, so we can set their
"start/stop" to OFF. After setting the temperature, click
"Production Mode" to start heating, and then click the Back button to
return to the main interface.
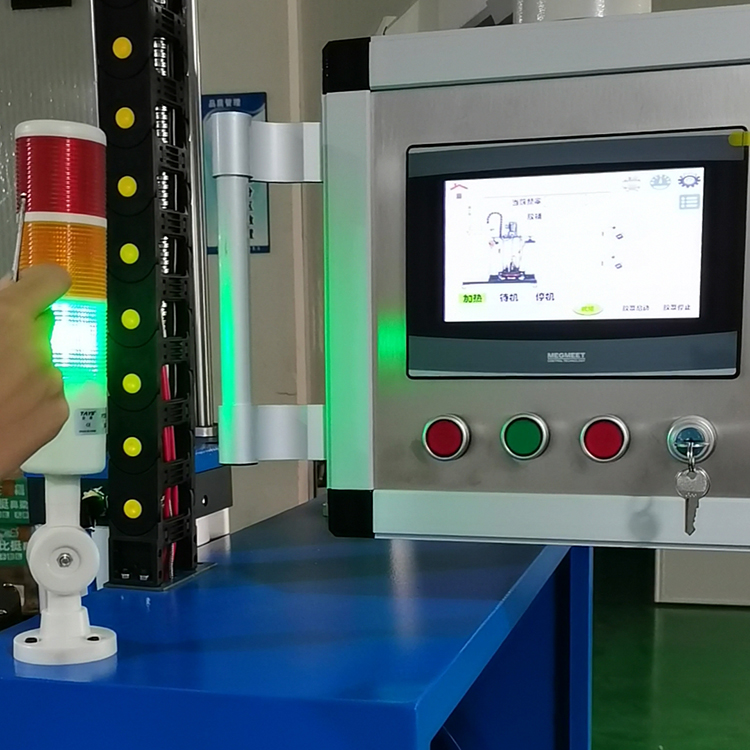
At this time, it takes 6-10 minutes to wait
for the hot melt glue machine to heat up. We can install the glue bucket first,
put the glue bucket on the bottom plate and position it properly. When the
three-color indicator light turns green, it indicates that the temperature has
reached the working state. We can press the "press down" button on
the control panel to slowly lower the pressure plate and approach the mouth of
the plastic bucket, check again whether the pressure plate is aligned with the
mouth of the plastic bucket, and lock the fixed block of the plastic bucket
after determining the position of the plastic bucket. . Then open the exhaust
valve and continue to press the seal ring of the pressure plate such as
"press down" into the rubber bucket and press the "automatic
press down" button. The platen will sense whether it touches the hot melt
glue and stop pressing. At this time, we pay attention When a small amount of
hot melt glue flows out from the exhaust valve, it means that the air in the
plastic bucket has been exhausted, and the exhaust valve can be closed.
After all preparations are completed, you
can click "Glue Pump Start" on the touch screen to start working.
 English
  Esperanto
  Afrikaans
  Català
  שפה עברית
  Cymraeg
  Galego
  Latviešu
  icelandic
  ייִדיש
  беларускі
  Hrvatski
  Kreyòl ayisyen
  Shqiptar
  Malti
Malti  lugha ya Kiswahili
  አማርኛ
አማርኛ  Bosanski
  Frysk
Frysk  ភាសាខ្មែរ
  ქართული
  ગુજરાતી
  Hausa
Hausa  Кыргыз тили
  ಕನ್ನಡ
ಕನ್ನಡ  Corsa
Corsa  Kurdî
Kurdî  മലയാളം
  Maori
Maori  Монгол хэл
  Hmong
Hmong  IsiXhosa
  Zulu
Zulu  Punjabi
  پښتو
پښتو  Chichewa
  Samoa
Samoa  Sesotho
  සිංහල
සිංහල  Gàidhlig
  Cebuano
  Somali
  Тоҷикӣ
  O'zbek
  Hawaiian
  سنڌي
سنڌي  Shinra
  Հայերեն
  Igbo
Igbo  Lëtzebuergesch
  Malagasy
  Sundanese
  Yoruba
  Español
  Português
  русский
  Français
  日本語
日本語  Deutsch
  tiếng Việt
  Italiano
  Nederlands
  ภาษาไทย
  Polski
  한국어
한국어  Svenska
  magyar
  Malay
Malay  বাংলা ভাষার
  Dansk
Dansk  Suomi
Suomi  हिन्दी
  Pilipino
  Türkçe
  Gaeilge
  العربية
  Indonesia
  Norsk
Norsk  تمل
تمل  český
český  ελληνικά
  український
  Javanese
  فارسی
فارسی  தமிழ்
தமிழ்  తెలుగు
  नेपाली
  Burmese
  български
  ລາວ
ລາວ  Latine
  Қазақша
  Euskal
  Az?rbaycan
  Slovensky jazyk
  Македонски
  Lietuvos
  Eesti Keel
  Română
  Slovenski
  मराठी
मराठी  Srpski језик
  కో., లిమిటెడ్.")


